Hello Survivors!
We always had a feeling that this day would come… Some well-meaning sour brewer was trying to milk the funk too hard… trying to use phage viruses to splice lactic acid genes into a strain of Brettanomyces and BAM… Zombies everywhere. Oh well, the world was nice while it lasted…
But it didn’t end did it? Hell no! Few things in life are a stronger motivator for survival than a basement full of homebrew and all of those carboys of aging sour beer that you’ve been patiently waiting to blend. You weren’t about to let a few zombies screw up that kind of time commitment. So you fought back, morale fueled by fermented goodness, you defended your brewery more tenaciously than Pedio clings to an infected barrel… and you prevailed. Slowly, the weeks turned into months, and then eventually years. As the time passed by, both society and your beer supply eventually disappeared. At least one of these two problems will not stand!
Now, armed with a wooden mash paddle well worn and splintered from cracking zombie skulls, you look toward the future: The Time Has Come To Brew! And on that note, I present to you:

Part 1: The Challenge Ahead
 Let’s face it, we homebrewers had a pretty nice and cushy deal going before the whole apocalypse thing. A multitude of homebrew shops both locally and online, hundreds of fresh lab-grade brewing strains to choose from, and nearly limitless choices in both ingredients and supplies. Without these resources at our fingertips, the prospect of brewing something that doesn’t taste like prison toilet wine just got a whole lot trickier. That being said, cheer the hell up! It could be a lot worse… At least you had the forethought to print out this guide before the internet blinked out with the rest of our infrastructure! In my opinion, an apocalypse without humor isn’t an apocalypse worth having. The person who’s moping around thinking about the past is the person who gets eaten… and you are not that person. You are the one who is going to rebuild, brew kick-ass beer, and eventually rise to the highest level of respect in your tribe or whatever the hell passes for a society these days. So let’s get started!
 The challenge is simple: How does one construct a brewery, source ingredients and microbes, and brew delicious beer without the convenience of modern society? It certainly won’t be easy, but it is completely possible. And frankly, if Bruce Campbell could rig up a chainsaw arm and slash through an army of deadites, you sure as shit can cobble together a brew pot and mash tun!
Part 2: Brewing Gear
When it comes to the creation of brew gear, we are looking for accessibility and functionality over aesthetics and automation. We are going to assume that most survivors aren’t rocket scientists, and no-one is tasking you with building a space shuttle or ending world hunger (the zombies already did that for us). All that this gear has to be able to do is take a flame and not leak too much. For the purposes of this guide we are going to create a 3-vessel brew system: A hot liquor tank, a mash tun, and a boil kettle. Some of you will be able to scrounge perfectly functional equipment out of abandoned houses or settlements, but if your raids keep coming up empty, here are some suggestions:
55 Gallon Steel Drums – If you can snag these they will make excellent HLTs. They’re not super durable but their thin non-stainless walls will be easy enough to cut with a hacksaw.
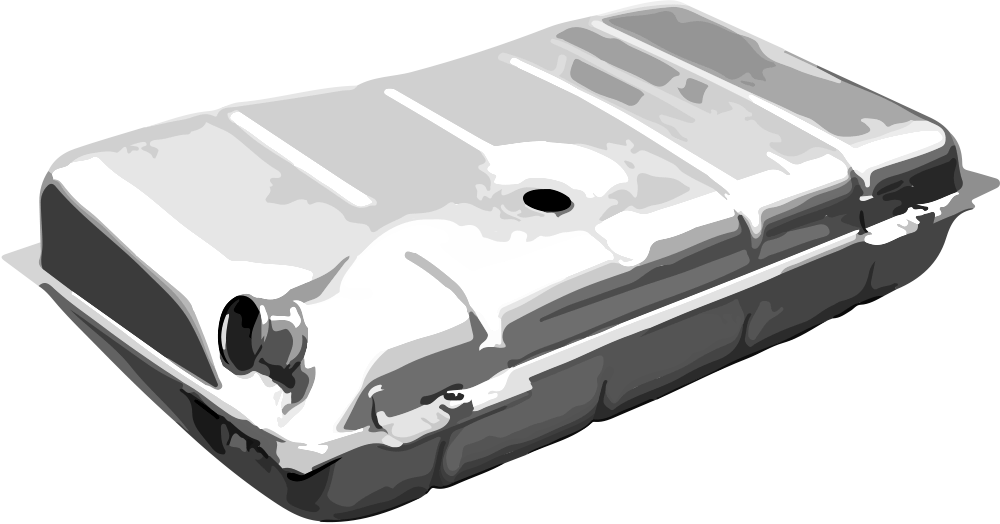 Car Gas Tanks – With over 1 billion cars currently on the planet, these bad boys should be all over the place. Rinse them out thoroughly and convert them into HLT’s or Kettles. What about all of the toxic detergents and stabilizers in gasoline? Relax and have a homebrew!
Old Chest Freezers – These can be converted into nearly perfect infusion-style mash tuns. The walls, floor, and lid are insulated for maintaining temperature and a lot of models have a pre-made drainage hole in the floor for sparging. Lay a couple of steel or fiberglass window screens in the bottom on top of a layer of tin cans… Instant false bottom!
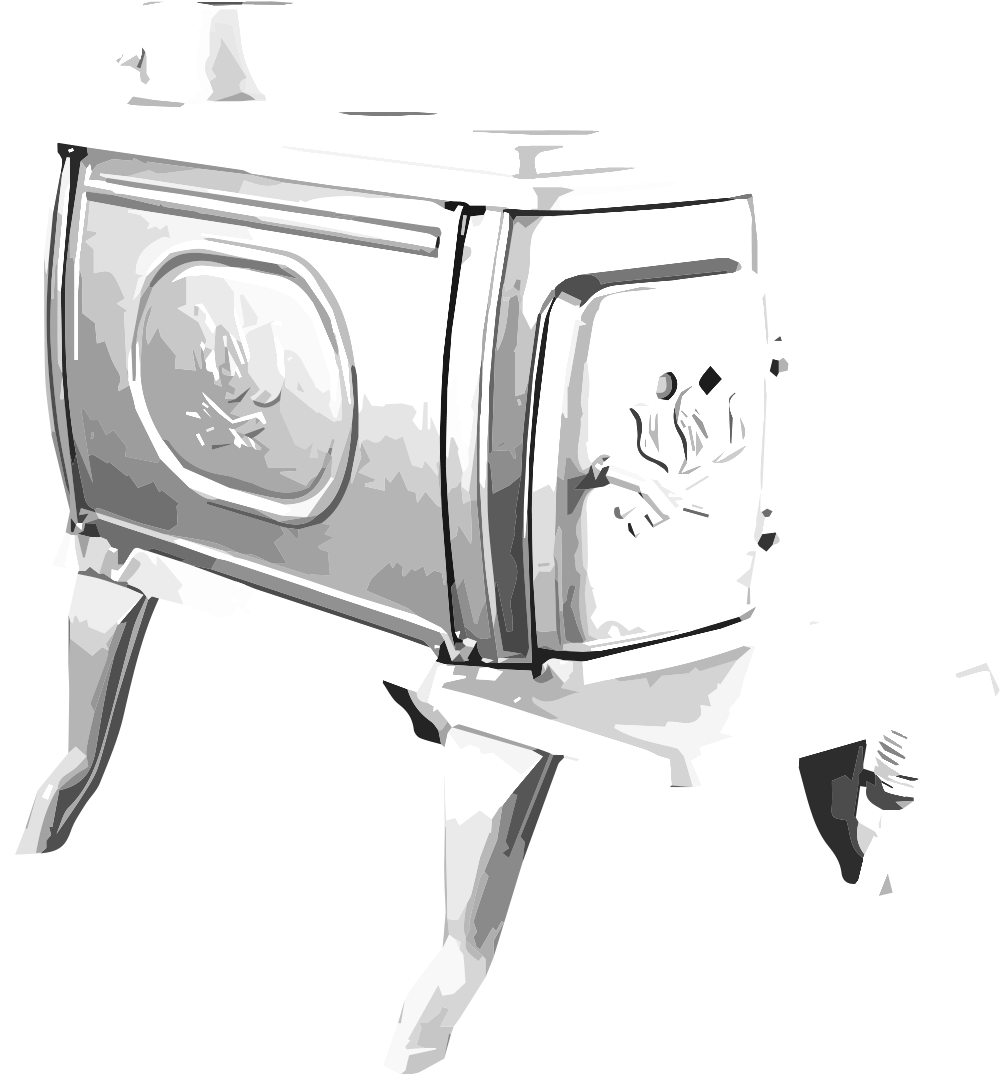
 Survival is all about thinking outside the box. For example, if you can’t find or build the gear to create a valve in your HLT, you can always shoot a hole into the side and plug it with something. Rig up the HLT so it is above the mash tun. Then when it’s time to sparge, pull the plug and let gravity do its thing. Looking for fuel to fire these vessels? Chances are that the propane supplies have already run out so wood fires are probably going to be your easiest and most renewable resource. This assumes that you are “living” in a rural area, but this is probably a safe bet because shortly after the outbreak, all the major cities became hellish zombie smorgasbords. Speaking of zombies, since you’ve been brain-panning plenty of them, you might as well burn up their corpses when firing your brew kettles. It’s not so much that they are a good fuel source, but nothing boosts clan morale like a good old fashioned zombie fire!
Part 3 – Establishing a Supply Chain
This is where the post-apocalyptic “rubber meets the road” so to speak. In a perfect scenario, you live on a big functional farm with a close knit group of other survivors. If this is the case, awesome job! You may actually be able to live out your days with a decent supply of beer. On the other hand, if you’re currently residing in some bombed out bunker, hoping that it rains again soon so that your “drinking puddle” doesn’t dry up… then you’ve got a bit more work cut out for you.
 The point here is that you need a supply chain: access to the raw ingredients that this guide will help you transform into beer. In some cases, this may take the form of scavenging what supplies are left over from former civilization. Or, if you’re a scumbag, you might consider raiding other settlements to steal their supplies. In the most productive form of this narrative, you will take charge, rescuing other survivors, and begin to rebuild civilization. Beer likely motivated mankind to settle down and create villages in the first place, and it can do it again! So get out there, kick zombie ass, and get together a clan of survivors to help carry on towards a brighter and beer-ier future. The rest of this guide will assume that you’ve got some basic cereal grains, some hops, and a water supply to work with.
Part 4 – Malting Your Own Grain
Congratulations, you have managed to get your hands on some sort of cereal grains without getting your ass eaten. Nice work! Hopefully, you’ve scored some barley and wheat. But if not, its also possible to malt your own oats, spelt, or even other more obscure grains.
Malting, at its core, is the interrupted germination of a plant seed (in our case the seeds of the barley plant). To do this, we are going to need to put our post-apocalyptic minds to work towards rigging together a malting setup.
 If we are looking to create pale malt, the essential base grains of our beers, you could hardly do better than an open concrete floor in an enclosed garage or warehouse. To this space we are going to need to add some ability to heat the air in the room without making it tremendously smokey. To do this, I would suggest installing several wood fired stoves with piping to the outside to vent away smoke.
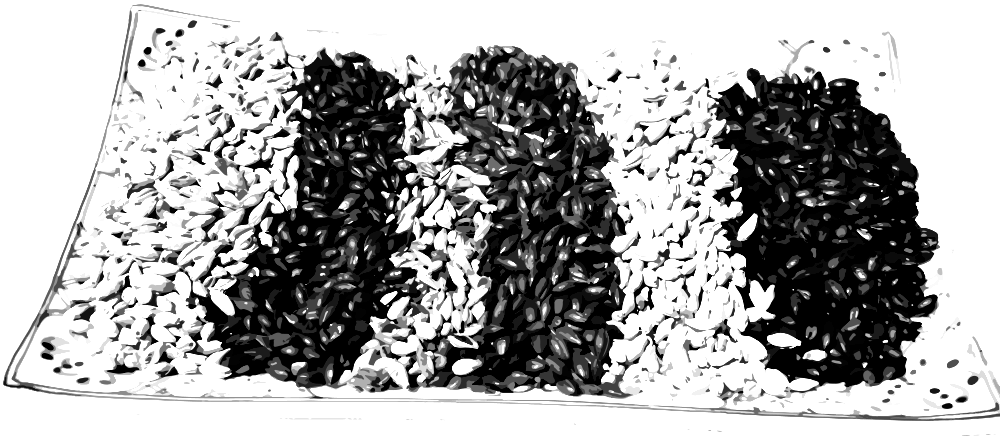
The malting process starts with a thorough soaking of the grains in water, I would suggest using large drums, wheelbarrows, Rubbermaid tubs, etc. to accomplish this. Allow the grains to soak for 4 hours and then spread them out on the concrete floor in a layer several inches thick. Now we are going to allow these grains to start sprouting. Every 12 hours or so you will want to turn and rake the grains so that they stay evenly moist and get access to the air (this prevents mold). Monitor the grains for the growth of an acrospire. Once this structure reaches the opposite end of the kernel (under the husk), it will be time to dry and kiln the malt. This germination phase usually takes about 2 to 5 days.
 In order to kiln the malt, we are going to fire up our series of wood stoves, attempting to hold the temperature in the room between 90° and 110° F. During this heating time, we will be raking and turning the grain every 4 hours, while circulating as much air across the grain as possible. If you’ve got some type of generators that can power electric fans, now would be the time to bust those bad boys out. By the way, if you locate this kilning room below your settlement quarters, you can vent some of that excess heat into your living spaces during the winter time. In the summer time that same setup is gonna suck, but people should really be outside farming barley and watering the hops during the warm months anyway…
When the grains are fully dried out, the process is done and you’ve got malt. Pack the malt into the most moisture resistant containers you can produce and pat yourself on the back for a job well done.
Did we really just compress hundreds of years of malting science into two short paragraphs? You bet we did! Will this process produce malt… Yes! Will it be high quality, well modified malt that is easy to brew with? Hell No! Let’s not kid ourselves… You are not a professional maltster, and the malt you create is going to be kind of shitty, but that’s okay! Because, for most of human history the malt was pretty shitty, and people were still able to produce some fantastic beer with it by getting a little creative in the brew house.
So now that I’ve set your expectations appropriately low, let’s talk about the basic process of creating two other important categories of malt: roasted and caramelized.
 Both of these malt varieties are created by kilning the malt at higher temperatures. In the case of roasted malt, the malt is heated to dry at oven temperatures while in the case of caramelized malt, the grains must remain very damp during the initial heating process.
To create roasted malt, we will want to rig together multiple sheets of metal (baking sheets would work well for this) so that we can heat the malt directly over a woodstove while the malt still receives adequate airflow. The malt is heated until the desired coloration is achieved (anywhere from light brown to black). Once cool, it is best to allow this roasted malt to age for a month or two before use to allow some of the harsher flavors produced during kilning to mellow.
 Crystal / Caramel malt can also be created on top of a woodstove by sealing wet base malt into a covered pot or pan and closely monitoring the temperature. In essence, you are mashing the grain inside its own husk before heating it up further to finish its kilning and drying. Soak your base malt in water for about 4 hours then spread the malt into a covered baking pan or large pot in a layer about 2 inches deep. You will then slowly heat the grain to between 150° and 160° F for 90 minutes. After this, uncover the grains, preferably spreading them out more thinly onto the same baking sheets that you use to create your roasted malts and heat them to about 250° F for around 2 hours. During all of these processes, it is important to frequently stir and flip the grain so that it heats as evenly as possible and doesn’t scorch.
Of course, if you have a working electric oven you can use this marvel of modern convenience to produce small batches of roasted or caramelized malts with a great deal of ease. But let’s face it, the grid went down years ago and since then, that beautiful glass top electric oven in your kitchen has become an absolutely top-of-the-line rat-proof storage box.
Part 5 – Growing Your Own Hops
Now that I’ve given you a crash course in becoming a shitty maltster, it’s time to learn how to be a half-assed hop grower. To be fair, producing high quality commercial grade hops is the forte of professional farmers, which you are not, and you will not become based solely on a brewing guide, even one as kick-ass as this. Therefore, if you’d like to continue brewing with all of those amazing, dank, citrus and tropical fruit hops that were so popular before humans became food, the only real option is to move your colony to an abandoned hop farm in one of the famous hop growing regions of the world and set up shop.
 For the less initiated post-apocalyptic brewers, we are going to have to assume that you have at least found a few viable hop rhizomes in the backyard of one of your dearly departed former homebrew club buddies… Sigh… if only they had put a little less time into winning medals and more time into stocking up on weapons.
With hop rhizomes gathered, these hardy plants are relatively easy to grow in most climates if you follow these basic points of advice:
- Plant hop rhizomes horizontally about 2 inches under the surface of the soil and spread about 3 to 5 feet apart.
- When the plants sprout, you want to trim back excess shoots, only allowing about 3 of the healthiest shoots to grow from each crown.
- Hops prefer slightly alkaline soil (if it will grow potatoes and other typical root plants it will be fine for hops).
- Manure, natural compost, and decaying zombie corpses will work very well to fertilize hop plants. (Like the buffalo to Native Americans, you will eventually learn to use all of the parts of a zombie to your benefit.)
 The vines will need to be given adequate room and support to grow. Poles, suspended twine, or trellises will suit your needs.
- Hops like to be watered frequently but not kept in permanently wet soil.
- Many common hop diseases occur when plant leaves are too moist, avoid watering the leaves and just water the soil directly.
If you are even half as competent at growing hops as you are at putting down zombies, you will eventually find yourself ready to harvest your fine hop crop. If the hop flowers feel firm and heavy (moist) to the touch, they are not ready to pick. However, once the flowers feel airy and light, this is a good sign that they are ripe for harvest. You can confirm this by pulling a few off the vines and rubbing them around inside your hands. If your hands are covered in aromatic and yellow lupulin oils then its harvest time!
 Once harvested, the hop cones will need to be dried in order to keep them shelf stable. This is best done by assembling racks made out of window screens or other mesh materials. Spread the hops out and let them air dry for about 3 days. If you need to speed up the drying process, you can always heat up the air a bit making use of the furnaces in your malting space, but make sure to keep the temperatures limited to those you use to air kiln base malts. Either way, when the central spine of your hop flowers breaks under pressure rather than bends, your hops are now dried and ready for storage and, more importantly, brewing!
What if you were unable to find hop rhizomes or, despite your best efforts, your hop crops failed to grow? Once again, sour beer comes to the rescue! You can always choose to formulate sour recipes without the inclusion of hops. While many classic beer styles would taste like complete crap without good hops, a wide variety of delicious sour beers can be made without so much as a single cone.
Part 6 – Getting Yeasty
At this point you should give yourself a big ol’ high five for actually putting together all of the basic ingredients needed to make beer, minus one… yeast.
Luckily for us, brew worthy Saccharomyces strains and a variety of the funky microbes needed to make sour beers are all around us in nature, happily doing what they do completely oblivious to the perils which have befallen mankind. Sour beer fans will find that their tastes suit them particularly well in a post apocalyptic world. Without the convenience of pure lab cultures, it will be more difficult, but not impossible, to brew clean beers. Regardless of whether you prefer your ales clean or funky, we will first have to get our hands on some yeast.
 The most obvious choice here is to try to harvest good brewing strains from existing cultures laying abandoned in homebrew shops. A second option for finding brewing strains is to collect the dregs of bottle conditioned beers left over from before the collapse. I am going to assume that you don’t have the lab equipment needed to streak plates and maintain pure cultures of brewing yeast. I think this is a safe assumption because if you have that gear, you probably have already skipped this section of the guide.
If you do get your hands on some bottle dregs or yeast vials sorely past their expiration date, the first step towards trying to nurse these strains back to health is to create a very low gravity (1.020) un-hopped starter wort. You will want to transfer a little bit of the dregs or culture you find into very small containers of this wort, and gradually step up the starter size once signs of growth become apparent.
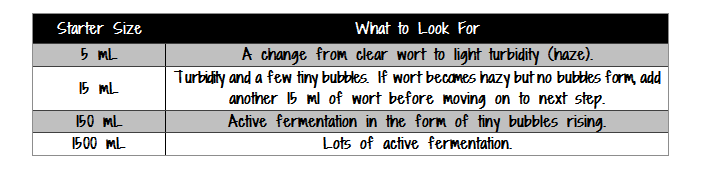
For those of us who cannot find pure brewing cultures to work with, we are going to collect yeast directly from nature. The first step in this process is to create a wort that will spontaneously ferment, but has been designed to resist a number of spoilage bacteria. To accomplish this we are going to create a 1.020 wort that has been pre-acidified to around 4.0 and has also been hopped to around 40 IBUs. There are a whole host of reasons you may not have a working pH meter… maybe you never figured they were important enough to purchase, maybe you bartered yours away for gasoline back when you thought this whole “end of the world” situation might improve, maybe the damned batteries just died… Regardless, if you don’t have a pH meter, then you are going to add acid to the wort (lactic, phosphoric, or citric) until you are able to distinctly taste a little bit of sourness competing with the sweetness of the malt sugars. While it’s not exact, this method should land you in the pH 4.0 ballpark.
At this point you would probably dip your favorite body parts into the wort if I told you it would make good beer, but for those skeptical sciency types who aren’t already dead: Both the IBUs and the pH adjustment will keep a variety of enteric, butyric, and lactic acid bacteria from readily multiplying in this “wild collection wort”, but these conditions will not inhibit Saccharomyces or Brettanomyces strains that are likely to make good brewing candidates. Keep in mind that these conditions will inhibit the growth of these bacteria, not kill them. Therefore, if clean beer is your ongoing desire for future batches, we will have to take steps to maintain your collected culture after you’ve used it for multiple generations of beer.
 With this wort produced, you will want to fill jars or other small containers and cover them with cheesecloth, fine mesh, or other types of screen that will keep larger critters like fruit flies out of the wort. Sit these jars out overnight in areas such as fruit orchards, fields, forests, or damn near anyplace really. Alternatively, if you find wild fruit (a natural environment for Saccharomyces) you can simply bring it back to your compound and add it right into your jars of wort there.
If your harvesting is successful, you should see signs of active fermentation begin within the first one to two weeks. Smell and taste these samples after active fermentation dies down. The ones that don’t make you want to puke are the ones that get promoted into the brewing pipeline. If you’re lucky, which is pretty likely given your survival to this point, then you might even come across some truly beautiful strains that smell and taste great. It’s the moments like this that make living in this nightmarish zombie hell totally worth it!
 Stepping backwards for a second to show my sour beer brethren some love… If sour beer is your goal, then the easiest way to accomplish this is to build yourself a house mixed culture. Simply omit the hops and acidification from your collection wort and start nabbing wild samples. You will be letting your samples chill out for a bit longer before tasting them, say one to three months. When tasting, look for pleasant characteristics of phenol development (funk), ester development (fruitiness), and lactic acidity. If different samples have different characteristics that you enjoy, simply combine the cultures and test them out on a batch of beer. If you continue to use and re-harvest your pitches, you should be able to establish a fairly stable mixed culture that reliably produces sour beers within about 3 to 10 generations of repitching.
Part 7 – The Post-Apocalyptic Brew Day
You’ve come a hell of a long way to get to this point, built a bunch of gear, established a clan to supply ingredients, transformed those ingredients into the proper forms for brewing, and ushered a bunch of zombies onto the next life along the way. Now it’s time to bring all of that hard work together: The Brew Day.
 A typical brew day in this new world paradigm may feel a little different from the brew days of your past. For instance, while the brew day used to be a chance to chill out by yourself, brewing alone in a post-apocalyptic world could become a death sentence. Your new brew days should be thought of as group projects, like a club brew, except instead of crushing grain and weighing hops, your extra helpers will be manning the guard towers, bringing in more wood to stoke the fires, and loading up some extra ammo clips in case things really get interesting…
Speaking from experience, my pre-zombie brews used to start with me plugging a bunch of ingredients into BeerSmith, but that’s not really an option since any electricity that you might be able to produce is probably too shaky to run a computer. This got me thinking that I should provide you with a nice long list of equations and calculations to create your recipes by hand. Well guess what? I’m not doing that. Your time is far too valuable to waste trying to fool yourself into thinking that a bunch of equations are going to make useful predictions from self-malted grain and homegrown hops. Rather, just brew a few batches and see how they turn out. You can adjust your recipe and processes from that point forward. Instead of recipe design, what we will talk about in this chapter is how to get the most out of inferior ingredients.
The first of these processes occurs in the mash. In the past, professional maltsters produced awesome, very high quality, and fully modified malts that would convert into all of the sugars needed to make a great wort with a simple infusion mash. Well you my friend are not one of those professionals, so we will be utilizing a step mash for your beers. You will want to target two lower temperature steps before heating up the mash to saccharification temperatures either by direct firing the mash tun or through infusions of boiling water. You want to make the mash fairly thick to help these first two steps be the most effective. Shoot for a grain to water ratio that leaves the mash feeling like a standard bowl of oatmeal, not so thick you could turn the bowl upside down without worry but not soupily thin either. I would recommend the following table as a starting point for your step mashes:
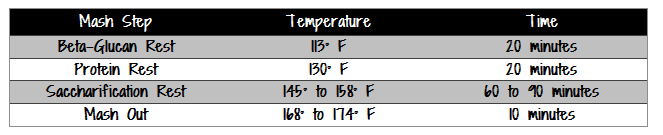
After the beta-glucan and protein rests you will want to add boiling water and / or direct fire your mash tun to raise the temperature to between 145° and 160° F. If you target a lower temperature in this range, your beer will become more attenuative, yielding a dryer, slightly more alcoholic, and potentially thinner beer. If you target a higher temperature, your beer will retain more unfermentable sugars, yielding slightly lower alcohol, with a fuller body and rounder finish. While short saccharification rests of 20 to 35 minutes work well for highly modified malt, when using your special brand of homegrown zombie malt, you will want to target longer mash rests of 60 to 90 minutes to ensure full conversion. After proceeding through the first three steps, fire your mash tun to raise the temperature to between 168° and 174° F for mash out and sparge.
Times are tough and farming is unpredictable, so there may be a number of cases where you need to incorporate some other sources of starch such as corn or rice into your beers. To use these ingredients, we will need to perform a secondary step called a cereal mash. If using un-malted wheat or barley, these do not require cereal mashing and can be crushed and added directly to your standard mash.
 If you are going to incorporate corn or rice into your beers (ie. you’ve been longing for a taste of the rockies…), you will start with a separate boil kettle. In this kettle, combine your corn or rice with about 10 to 15% malted barley, infuse with hot water, and target an initial mash temperature of 158° F and hold this temp for about 5 minutes. You will then bring the entire mix up to boiling temperature by direct firing the kettle. To keep the cereal mash from scorching you will want to stir it very frequently if not continuously. Continue to stir and boil the cereal mash for around 30 minutes before adding the entire mixture to your main mash.
If you are going to incorporate a cereal mash, keep in mind that you don’t want to use these alternative starch sources for more than 30 to 40% of your total recipe. Doing so will overwhelm the enzymes present in your malted barley and prevent the mash from converting fully. Additionally, remember that you can use the boiling temperature of the cereal mash component to raise the temperature of your main mash. Therefore, it is best to add the cereal mash into the main mash once you’ve completed your protein rest.
 After a successful mash and sparge, it will now be time to boil the wort and add any hops. Even in a world where your former friends may be trying to eat you, you can take comfort in the simplicity of a kettle full of boiling wort. Stoke up your wood fires and give them plenty of ventilation to help achieve a boil quickly. A proper full-wort boil lasts 60 to 90 minutes, but you can get away with shorter or longer boils if necessary. Keep in mind that most homegrown hops are relatively low in alpha-acid, so if you’re craving some IPA level bitterness you may want to boil your hops for a bit longer to isomerize more alpha acids. That being said, I would avoid taking this to extremes because hops boiled for longer than 90 minutes tend to produce a much harsher, less pleasant, form of bitterness.
 The trickiest part of the brew day may be the challenge of cooling the wort to fermentation temperature. If you’re lucky, you may have flowing cold water that allows you to use immersion or counter-flow wort chillers, but frankly this seems pretty unlikely. One option may be to use thermal load to help cool the wort. If you’ve got a giant tank of room temperature water, you could install hundreds of feet of copper tubing inside of such a vessel and let the wort flow through this tubing by gravity or siphon. Another option would be to brew near a body of flowing water and lower the entire brew kettle into the cool flowing water by means of a pulley system. If none of these options are feasible, you could simply let the wort cool slowly to room temperature inside of smaller stainless steel fermenters. Raid a former bar and bring all of the empty kegs back to your compound. The serving tubes can be removed from these to yield fantastic 15 gallon fermentation vessels. Your hot wort can be pumped into these kegs and their tops can be covered with foil or sealed with sanitized sponges. If this method stirs up an internal sense of anxiety over DMS production, this can easily be combated by extending your boil length to 90 or 120 minutes.
Part 8 – Fermentation and The Art of Giving Less of a Shit
 In a zombie-ridden post-apocalyptic world, the hardest thing about brewing good beer is actually going to be forgetting all of the strict approaches to brewing science that made such wonderful beer in the past. In your current situation, you are going to be lacking some important data regarding your beers such as cell counts, IBU calculations, or potentially even gravity measurements. While this is your new reality, fret not my thirsty survivalist friend, mankind’s most important brewing tool has always been their sense of taste, and given your choice in reading material, it’s clear that you have impeccable taste!
You’ve completed your brew day and now have both wort and some type of yeast pitch ready to go. How much yeast should you add to each vessel of wort? Well, the answer is: The amount that works to produce a beer that you are happy with. The true art of crafting great beer in the absence of advanced measurements is repetition and refinement of your process.
 To get you started, assume a pitch rate of about 100 ml (or about 1/4 of a standard tin can) of thick yeast slurry will be enough to ferment 5 to 10 gallons of average strength wort. Wort oxygenation is important to healthy fermentation, but pure oxygen canisters and sintered stones are things of the past. Leave a healthy airspace in your fermentation vessels and shake the wort vigorously for about 5 to 10 minutes before pitching your yeast. In the absence of temperature control, opt for temperature stability. Locate your fermentation space in a basement, cave, or other such structure that will offer a stable environmental temperature. Given these conditions, most yeast strains will produce reasonable results. If you are working with wild strains that you’ve captured, many of these strains will perform best when treated like a saison yeast. Try to find a fermentation area that holds a stable temperature in the low to mid 70’s F. These fermentations can be allowed to free rise in temperature up to the low 90’s F and will often still produce excellent (albeit phenolic and spicy) beer.
 After signs of active fermentation are finished, you will want to carbonate your beer in kegs, bottles, or casks. There are two ways to achieve carbonation, you can add priming sugar to your fully attenuated beer or you can seal a beer into its serving vessel before the final attenuation is achieved. If you are resourceful enough to have access to sugar, you will want to boil 4 ounces of corn sugar (or 3.5 ounces of table sugar) into two cups of water and add this to each 5 gallons of finished beer. Naturally, this is just a starting point, and you may need to adjust this amount slightly up or down for future batches.
If you are like most zombie survivors, and have used up any stocks of pure sugar long ago, you can measure the gravity of your beer and estimate its final attenuation to produce carbonation in the serving vessel. Each point of specific gravity will produce about 0.5 volumes of carbonation. Therefore you will be looking for a change in 4 points of specific gravity (1° Plato) to produce a moderate level of carbonation (2.0 volumes). If you haven’t brewed your recipe before or are using a new yeast culture, this extra gravity could also be achieved by mixing fresh wort into fully attenuated beer.
 If all goes well, you and your hard working clan members will soon be able to brighten up your otherwise bleak lives with some delicious beers, born of the fruits of your own labors. Mankind has been in tough spots before, and now, as true is it was back then, beer will help to hold society together as you grow and rebuild. Your first few batches might be just one grade above pond water, but trust in yourself as a badass brewer, and not even a horde of zombies will be able to stop you from refining and perfecting your beers. Stand tall, keep brewing, and lead us toward a better future.
Part 9 – Troubleshooting and Adjusting Your Process
You didn’t come all this way just to brew one batch of mediocre beer and then call it a day. To help you refine your process, I’ve composed a short guide of observations you may make about your beer and the steps needed to adjust these characteristics:
Active fermentation doesn’t start within 24 hours of pitching – Make sure that you’re shaking plenty of air into your wort to increase oxygenation. If this doesn’t help, increase your pitching rate. If this still fails, your yeast pitch may be of very low health. Make sure to harvest your yeast by top cropping active healthy yeast during previous fermentations or by collecting the yeast cake shortly after a previous fermentation.
The beer tastes like canned corn – This is due to DMS production which can be combated with increased boil lengths, quicker wort cooling, or by increasing the vigor of fermentation through pitching plenty of fresh, healthy yeast.
 The brew day keeps getting interrupted by zombies – Plan your brew days for the winter months when zombies will be frozen solid. Fortify your brew space with metal fencing, guard towers, and torches. Keep weapons handy. The most successful brewers will learn to build brew gear / weapon combos that can be used to kill zombies in a moment’s notice.
The beer tastes like green apples / cider – This flavor, caused by acetaldehyde, is most often associated with an incomplete fermentation or lack of aging time on the yeast cake. Slow down my friend, I know you’re craving that sweet sweet beer, but it will be even better if it’s given a few extra days to a week of aging time on the yeast cake after active fermentation is complete.
The beer tastes like butter – This flavor, created by a compound called diacetyl, can occur shortly after fermentation by a number of yeast or bacterial strains. If it is present, its best to allow the beer to continue aging for up to a few extra weeks on the yeast cake. This clean up will occur the most rapidly if the beer is held at a temperature above 65° to 70° F. If you are brewing a sour beer, having a healthy and attenuative strain of Brettanomyces at work in your mixed culture will help to clean up this flavor.
 You are missing a vital piece of brewing gear – Stop bitching. Get innovative. Brew anyways.
The beer smells like burnt matches, or rotten eggs – These aromas, caused by sulfur dioxide or other sulfur containing compounds, can be common to beers fermented with a variety of yeast strains. They are typically removed by the off-gassing of carbon dioxide during fermentation, making them more common in beers with slow, lackluster fermentations. If your yeast is producing this problem, try adjusting your pitch rate up or down, and raise the temperature of fermentation to yield a more vigorous ferment.
The beer tastes astringent, or harshly bitter – Astringency in a beer is a mouthfeel quality produced by chemicals called tannins. The most common source of unwanted tannins in a beer is from sparging too hot during the mash or from boiling too high of a volume of hops for too long of a time. Avoid sparging at temperatures above 174° F and limit hop boiling times to 90 minutes or less.
 Your clan members don’t trust that you’ll be able to make beer – You can tackle this situation several ways. Perhaps the easiest way would be to scavenge old bars and restaurants until you find a bottle of beer, take off the labeling, and then tell your clan members that you made it. This should motivate them to start farming barley and building brew gear immediately. Another option would be to hold a meeting, and talk their ears off about all of your brewing knowledge. Throw some random stuff in there like Saccharomyces lag times, the details of alpha acid isomerization, and the esterification of acetic acid into ethyl acetate. Before you know it, they’ll promote you to clan leader and as a bonus you’ll get your pick from any of the eligible ladies or gents! If none of that works, just go off to wander the wasteland as a loner until you find a new clan looking for a top notch brewer.
The beer tastes solventy, or like rubbing alcohol – These flavors often occur in fermentations that are stressed by poor yeast health or by elevated temperatures. Try increasing pitch rate, or moving your fermentation vessels to a cooler space.
The beer tastes sour – This is a byproduct of souring bacteria taking hold in your mixed culture. You can either embrace these flavors and brew beers that work with them, or you can try to reduce the effects of bacteria in your mixed culture by brewing hoppier beers. Question: What if your clan members don’t like sour beer? Answer: Get new clan members.
Part 10 – Building Your Legacy
I will wrap up this guide with a question: What type of legacy will you leave behind? Will you be that guy who brewed some beer that tasted aright if you were already drunk? That lady who brewed carbonated butterscotch sulfur bombs? Or will you be the person who not only brewed great beer, but in the process became a great leader? The person who threw the most kickass annual harvest festivals fueled by the best beer this side of fallout zone? The person who will be remembered in son g and tale long after the zombie plague has been wiped from the earth and mankind begins to rebuild? I know the type of brewer that I would like to be, and I hope you do too.
So have fun with your new found lot in life! Brew great beer, plan festivals, build your clan, and push back against the terrors of the world. Roast a few zombies under the brew kettles for a unique brew day experience. Carve out a few zombie skulls and turn them into decorative tap handles. Ask the children of your compound to paint colorful little murals onto the fermentation vessels. Invite neighboring tribes to taste your beer, and establish trade routes with them. The world always had problems, at least now you’re not stuck in traffic all of the time, right? So have fun, be happy, be irreverent, and be good to the people who are still human. Beer is a celebration of life, take what is left of yours, and make it worth remembering!


In Loving Memory of Those We Lost to the Zombies:
(aka. References)
“Caramel Malt Yet Again!” Brewing Beer The Hard Way, 26 Sept. 2016. Web. 10 Oct. 2016.
Colby, Chris. “Yeast Culturing from Bottles: Techniques.” Yeast Culturing from Bottles: Techniques. Brew Your Own Magazine, Web. 10 Oct. 2016.
Green, Dave. “The Science of Step Mashing.” The Science of Step Mashing. Brew Your Own Magazine, Web. 10 Oct. 2016.
Montell, Stephanie. “Hops in the Backyard: From Planting to Harvest and the Hazards in Between.” BT – Hops in the Backyard: From Planting to Harvest and the Hazards in Between. More Beer, Web. 10 Oct. 2016.
Palmer, John J. How To Brew: Everything You Need to Know to Brew Great Beer Every Time. S.l.: Brewer’s Publications, 2016. Print.
Smith, Brad. “Malting Barley Grain at Home.” BeerSmith Home Brewing Blog., 05 Dec. 2009. Web. 10 Oct. 2016.
Staff, BYO. “Cereal Mashing: Techniques.” Cereal Mashing: Techniques. Brew Your Own Magazine, Web. 10 Oct. 2016.